If you want to track your visitors minutely and appropriately, pixels are the way to catch them.
![]()
There are just two important things you need to do to get the process going.
To keep it simple you must install two kinds of code snippets on your website to get fantastic results. They are:
- Facebook Pixel base code on every page of your website
- and Event Pixel code on specific pages of your website.
Let’s go in detail about Facebook Pixel:
1. So what is Facebook Pixel?
The Facebook pixel is a code that you put in every header of your website’s page to track data. It accumulates data that helps you track conversions from Facebook ads, and retarget to people who have already performed some kind of action on your website.
2. Why we Need Facebook Pixel Code?
Facebook pixel information guarantees that your ads are seen by the people who are probably going to take the desired action on your website. This helps you to enhance your Facebook ad and improves conversion rate.
Whether it’s targeting or retargeting your customers you have to include pixel code in your landing pages for Facebook campaigns. Retargeting through Facebook is the best method to generate more profit in your business.
Facebook retargeting pixel data and dynamic ads help you to display targeted ads to people who have already visited your website. You have to be really smart here. For example, you can exhibit people an ad for the similar product that they deserted in a cart in your website.
You should use Facebook event tracking pixel for a particular conversion event on your website as well. With the pixel, you can optimize for conversions that are related to your business objectives, like purchases, registrations etc.
But to start your campaign for Facebook it is advised to have a website or a landing page for your business so that you can set a goal to target your visitors through pixels.
If you have a business website or not it doesn’t matter. There are online tools like Instapage which helps you to generatea landing page for Facebook.
3. How to generate and install Facebook pixel Code in your website?
As you have a clear understanding of what you can track for your business goals, let’s create a pixel code and insert it on your website pages.
-
So next I am sure you eagerly want to know, how to create your base or main Facebook pixel?
Here we go-
Step 1: Go to your Ad Manager. Click on the top left 3 bars.

Step 2: Then from Measure & Reports select pixels.

Step 3: Click on the green Create a Pixel button.

Steps 4: Provide a name to your pixel, put your website URL, and then click Create.
![]()
At the time of choosing the pixel’s name, you should understand that with events manager, you will only get one pixel for each ad account. The pixel name should denote your business, rather than a particular campaign or objective. If you need to apply more than one pixel per ad account, you can do it by using Facebook Business Manager.
Also Read: 12 Facebook Ad Myths You Should Not Believe Anymore
-
Do you want to know how to add the pixel code to your website?
Here we go-
Step 1: So that the pixel starts to gather data on your website, you are required to install code on your website’s pages. There are certain ways to do this and it depends on, which platform you are using for your website.
![]()
- If you are using a platform like Google Tag Manager then you can install pixel without doing any edit to your website’s code. This Facebook Help article explains how to install your pixel if you are using third-party tools.
- If there is a developer who can help you put your pixel code to your website,and then click on Email Instructions to a Developer in order to send your developer information they need to know about installing the pixel to your website.
- In case there is neither of the above alternatives applicable, then you are required to put the pixel code straightaway into your web pages.
Step 2: Now that’s what we are going to understand through this section that is to manually install the code.
- Click on Manually Install the Code Yourself.
- Copy-and-paste the pixel code into the headsection of your website. You are supposed to post it after the tag but before the tag. You need to put it into the head section of every single page of your website. If you are using CMS like WordPress it has the plugin, which will help to disperse website code on each and every section of your web page.
![]()
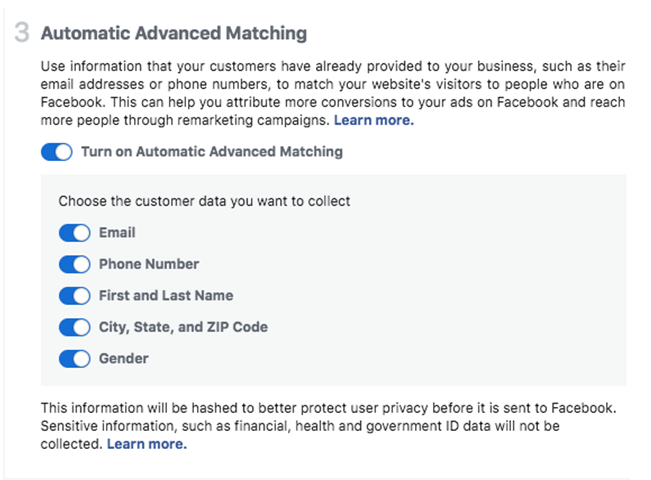
- It is better to choose automatically advanced matching.

Step 3: You should inspect whether you’ve installed the code properly by putting your website’s URL and clicking Send Test Traffic.
If your Facebook pixel is active then click Continue.

Or
You should go to the Facebook Ads Manager and choose Pixels from the top menu. If the status shows Active, your pixel has been installed properly. The process can take around 20 minutes for your pixel status to change after installation.
If your pixel status shows No Activity Yet that means your pixel isn’t working.
You can download the Facebook Pixel Helper extension to your Google Chrome browser. It is only available for Chrome, so incase you are using another browser, then you’ll need to install Chrome to use the Pixel Helper.
-
Do you want to know how to track the right events with event pixel code for your business?
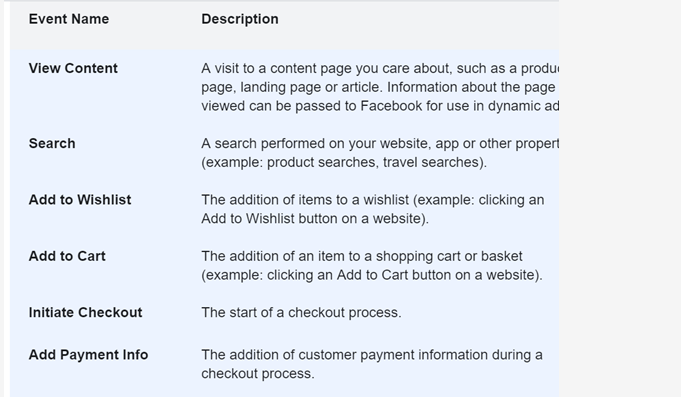
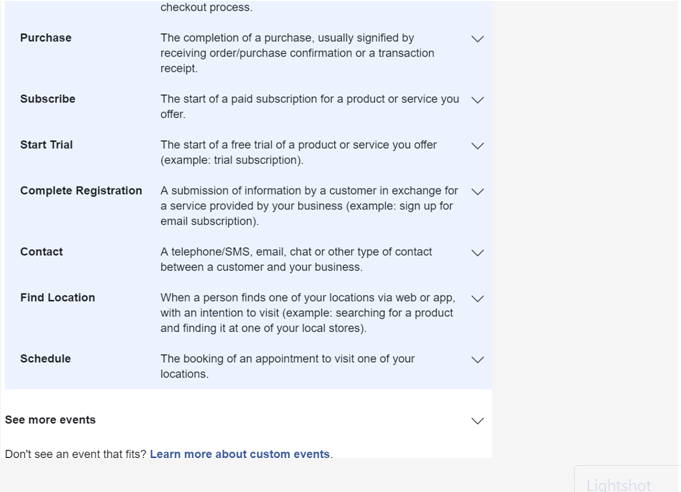
Event code helps your company track specific actions that happen on your landing page. You must install event code on particular pages of your website where the tracking actions will take place.
Step 1: Choose from the event categories you’d like to track.


Step 2: For any event, you should know either to track on page load or on action.
- Track event on new page load: Apply this option to track data that requires going to a new page, for example, complete registration accomplished page.You should put the code just below the closing head section of your web page (for some websites, this will be straight after the opening tag).
- Track event on in page action: Apply this to tracking action within your web page, like clicking on an “add to cart” button.You should insert this event code between script tags just immediately next to the action you want to track (for example a button).
- You should insert the event code just below the tag. This allows the event code to load with the pixel code when the page starts loading.
![]()
To track and optimize for more actions, you can add parametersto your events by implementing recommended or advanced installation options for your event tags. You can also create custom events for actions valuable to your business that you will define. There are mainly three implementation settings which are basic, recommended, and advanced.
Step 3: Place the event code on your order confirmation page,purchase completion page or any event page you want to track.
In order to check that your event pixel is working correctly,you should install Pixel Helper as I have mentioned above.
In this article, we are sticking to basics of pixels to get you going with the business. You can even create custom events in case you want to use other features than standard events on the basis of the suitability of your business. Custom Conversions and Retargeting I will cover in my next article.
To summarise I must say a Facebook pixel is the most important and effective tool. It will help you to make a profitable business strategy in order to meet your specific business objectives, which will help you, understand how to engage with present customers and track new leads.Even if you don’t have plans to advertise right now, installing the Facebook pixel, will give you a good idea of how people are behaving with your website. So here we go, install the base pixel code on your website and Facebook will start tracking your business data instantly.

Started working as a digital marketing expert, Varun Sharma is now also a well-known digital marketing speaker – a speaker on performance development, and a trusted mentor to businesses in the digital world. His keynote expositions are based on the digital marketing theories, which provide a fascinating insight into the secrets of high performance.

