
Are you looking for the option to reduce the time spent on web analytics? If yes, then you’ll be glad to know about the automate reports in Google analytics. It’s a new way to automate your reporting efforts in order to save some precious working time.

No doubt Google Analytics is an important tool for digital marketers. It should be reviewed on a regular basis. But, as it’s not always possible, we always wanted something which can automatically deliver us or our clients the reports by reducing our efforts.
But, really, is there any tool that can help in our reporting? Well! Cheer up marketers… because we have an automatic reporting option in Google Analytics. And, believe me! This tool helped me a lot in automating and improving my SEO reporting activities during the last few months. Try, It Worths!!!
You can also read: Top SEO Trends That Will Dominate This Year- 2017
Before jumping on to how to set up automatic reporting, for all those who are new to Google analytics, let’s have a clear vision of Google Analytics.
Google Analytics
Google Analytics is a free and powerful tool that allows an incredible flexibility to your site. It follows the traffic coming to your website like, on which page you are getting the most traffic and from which region most of the visits are coming, and so on.
On the basis of your business, google analytics divide a quantity of your website analytics information in very appealing ways.
It helps in following the performance of your keywords with a specific end goal to have a successful search engine optimization (SEO) campaign. You will have the ability to know how much traffic your every keyword is bringing on your website.
Benefits of Google Analytics
- Check visitors, whether they are coming through a referral link, organic searches, paid advertisement, or through other search engines.
- Check which of your pages have a high bounce rate, and which pages pull visitors’ attention.
- Check the flow of traffic entering to your website to understand the statistics of visitors.
- Audit the historical data of visitor traffic that has changed across large time periods.
- Get email reports, sub-domain management, outbound links, mobile statistics, social reporting as well as revenue tracking to increase the online visibility of your website.
Oh! It’s enough of Google analytics and its benefits right? Now, let’s come on the title…
“How to set up automatic reports in Google Analytics”
So, before we start setting up the reports, I would like you to know that we can schedule two types of reports in Google analytics;
- Single Page Report Scheduling: In this, one can schedule the current selected page of your google analytics area. For example, if you have selected organic traffic, then that particular page you will scheduled.
- Customized Report Scheduling: In this report, one can create your customized report and then schedule the same.
Talking about Single Page Report Scheduling, you need to follow the below given points;
- Log into your Google Analytics account of your website
- Then, select the report you want to schedule with all the parameters.
- Once everything is set, your report is ready to be scheduled.
- You must have seen and “Email” option in upper-left hand corner of the current page of your report, just click on that.

- And, as soon as you click the Email option, the below given screen will appear.
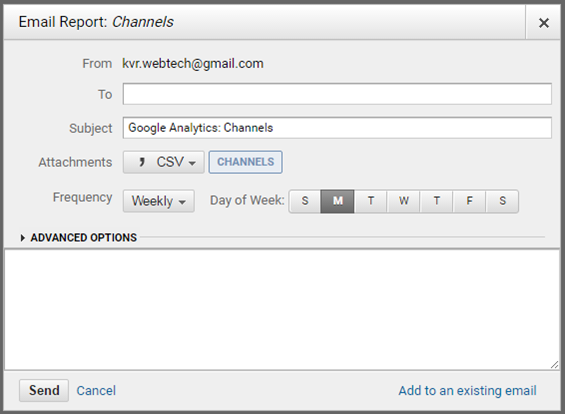
- The email address you used as your login is listed in the Field ‘From’.
- In the ‘To’ field, you can enter the email or list of emails separated with a comma to whom you want to send the report.
After that, enter a subject for your email. - Then, there is an Attachments option, where you need to select which format to receive the report in like- CSV, TSV, TSV for Excel or PDF.

- Choose a Frequency for how regularly you want the report to be sent like, Once, Daily, Weekly, Monthly, or Quarterly.
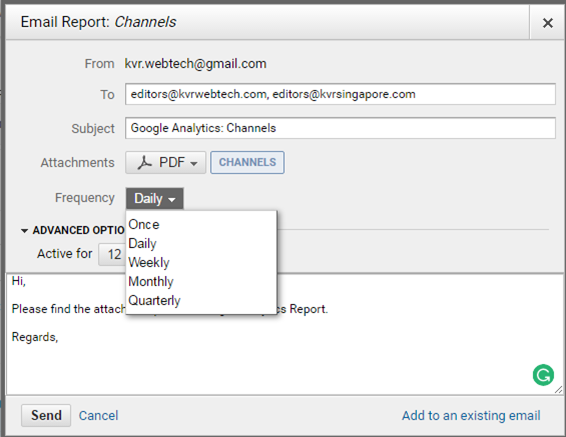
- If you choose weekly then you need to choose the day of week on which you want to deliver the reports every week.

- Under Advanced Options to select the duration you want the reports to be active for. The maximum duration is 12 months, which you can extend as per need.

- Enter the body of the email in the text box, which is mandatory to fill.
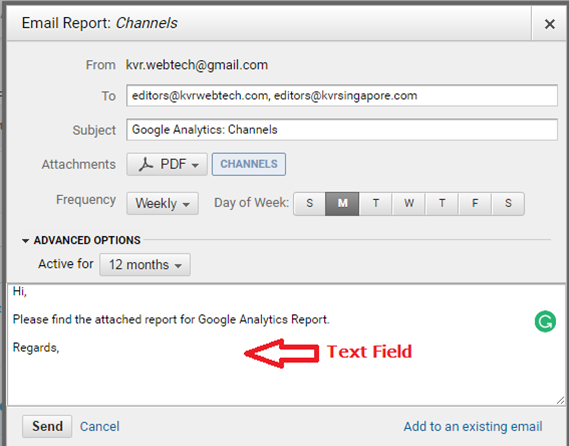
- At last, Click the Send button.
- You can even combine multiple reports with the help of ‘Add To Existing Email’ when you click on this option, you’ll find the below given screen.

Where to find your single scheduled report?
After following the steps for basic or single reporting, now the question is where to find your scheduled report?? So, below is the solution…
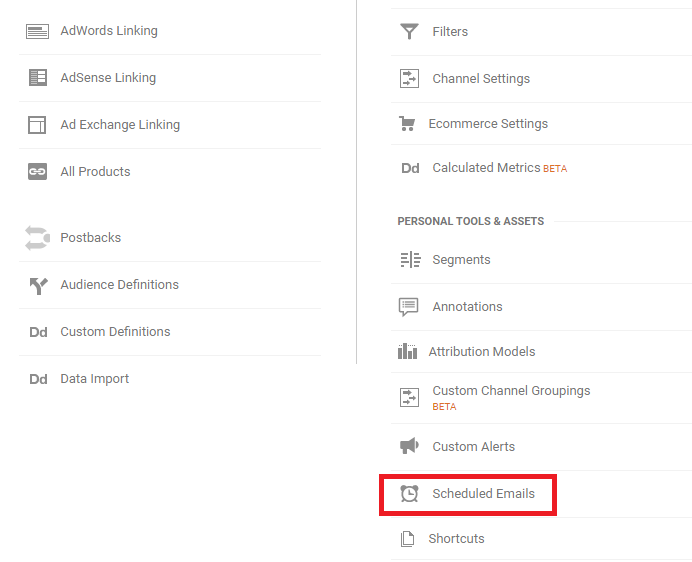
- If you need to revise any scheduled reports, you can do that by clicking the ‘admin’ button given on the left side of the navigation bar.
- In the admin settings, there is a link for ‘Scheduled Emails’. Here you will have the capacity to see and edit the reports you have made.
 Similarly, inCustomized Page Report Scheduling, below are the things to follow;
- Click on the tab “Customization” and after that select ‘Custom Report’.
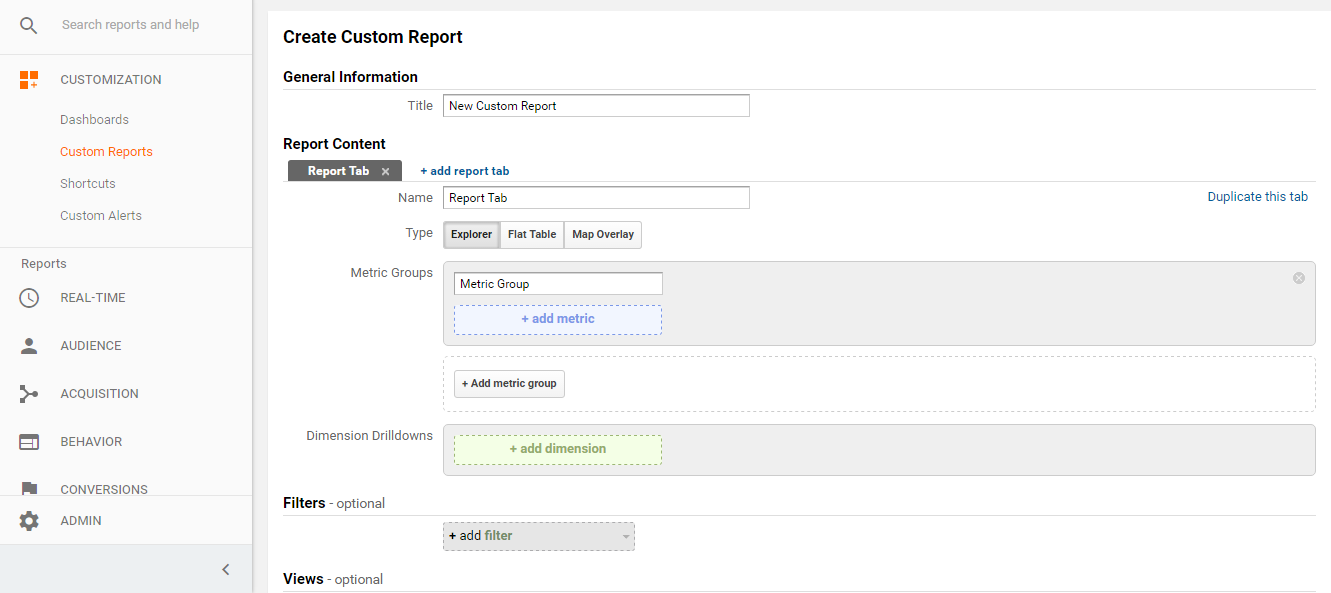
- While clicking on ‘Create Custom Report’, the below given screen will appear in front of you.

- Here, it’s mandatory to fill the following things;
a) Title: Give the title to your report.
b) Report Tabs: It allows you to create multiple tabs of information in one report.
c) Type: You can choose the design of the report.
d) Metric Group: This area lets you select which information you need to include in the report.
e) Dimension Drilldown: This is the place you can indicate how you need the information to be further divided.
f) Filters: You can add a filter in your report.
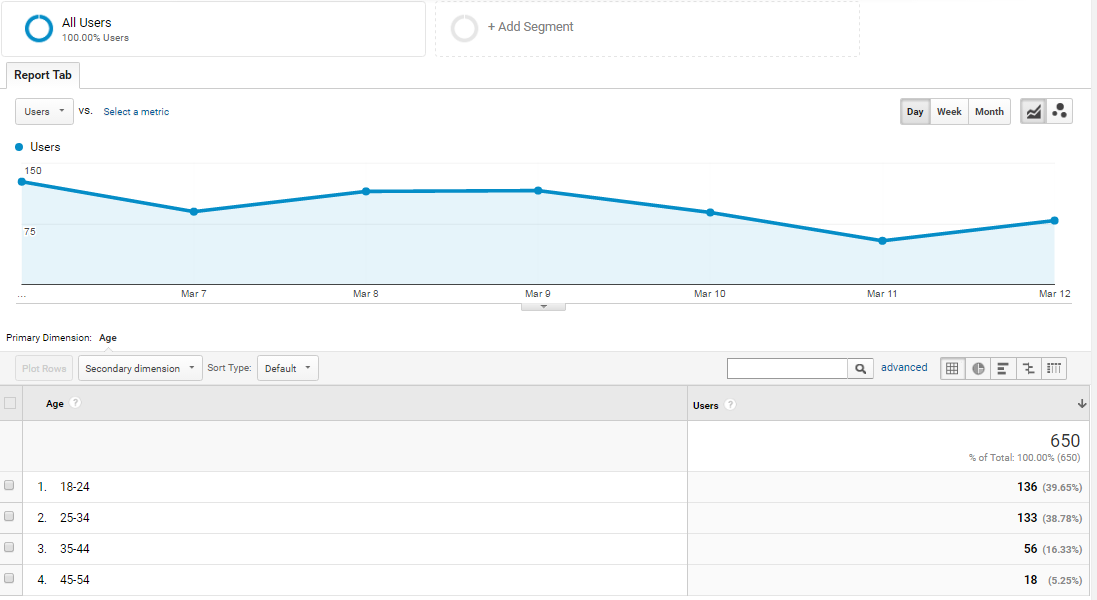
- Click “Save” and you will see the below Final report.
- After creating a custom report, you can schedule it in a same way you scheduled Single page report.
Where to find your Customized scheduled report?After following the steps of Customized Page Report Scheduling, with below given points we can find the customized scheduled reports;
- You can see your custom report in Customization tab and edit if needed.
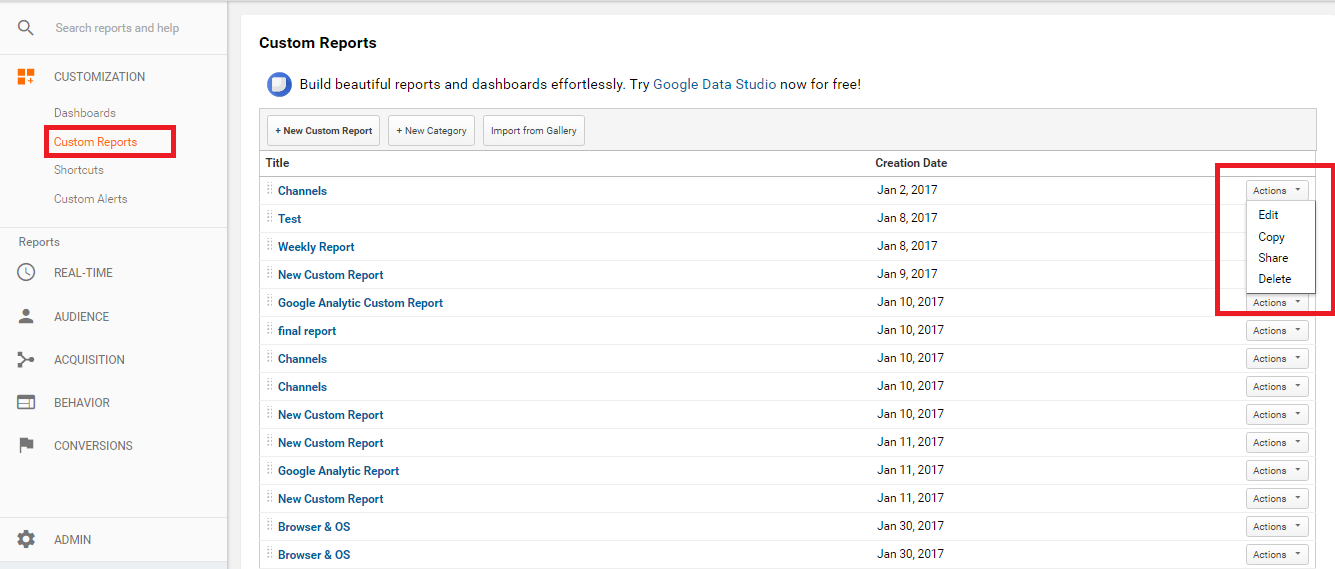
- Thus, through these ways you can schedule your reports and save your time.
The best part of creating automated basic and customized reports in Google Analytics is that it easily creates reports without taking much time. It helps getting your preferred reports on your scheduled time.
You can also read: 8 Amazing Ways to Boost Your Website Loading Speed
Liked the article? Then, hit the like and share button. Any suggestions or queries for us? Then, do share with us in the comment box given below!

